Are you a fan of classic MS-DOS games? Do you want to revisit the nostalgia of playing those games on your modern computer? Well, look no further than DOSBox. This emulator recreates a MS-DOS compatible environment and allows you to run many classic games. In this ultimate guide to DOSBox configuration, we will discuss everything you need to know to get started.
Firstly, you will need to install DOSBox to a directory on your computer. Once installed, create a folder specifically for your old games. This will make it easier to organize and access them. Next, you will need to use the MOUNT command in DOSBox to set the new drive for your virtual environment. By navigating to the newly mounted drive, you can run the game and start playing.
If you prefer a more user-friendly approach, there are alternate methods for running a game in DOSBox. You can use frontends, which provide a graphical interface for managing and launching your games. Additionally, you can create desktop shortcuts to your favorite games, making them easily accessible with a single click.
To optimize the performance of DOSBox, there are several commands you can use. The CTRL+F7 command decreases the number of frames skipped, while CTRL+F8 increases it. CTRL+F11 and CTRL+F12 decrease and increase the CPU cycles respectively. Experiment with these settings to find the right balance between smooth gameplay and performance.
Windows users have a convenient option for starting their DOS games. Simply drag the game’s EXE file onto the DOSBox program, and it will automatically start the game for you. If you want to save even more time, you can edit the dosbox.conf file to automatically mount your DOS games folder. This means you won’t have to manually set the drive each time you launch DOSBox.
Lastly, if you want to toggle fullscreen mode, simply press ALT+ENTER. This will switch between windowed and fullscreen mode, allowing you to play your games in the desired format. In our comprehensive article, we will delve deeper into each of these topics and provide step-by-step instructions for configuring DOSBox to suit your needs. Stay tuned to learn more!

The Ultimate Guide to DOSBox Configuration
DOSBox is a popular emulator that recreates a MS-DOS compatible environment, allowing users to run classic MS-DOS games on modern systems. Whether you’re nostalgic for the games of your childhood or just want to explore the history of gaming, DOSBox is the perfect tool for the job. In this guide, we’ll walk you through the process of installing DOSBox and configuring it to run your favorite games.
What is DOSBox?
Before we dive into the details of DOSBox configuration, let’s take a moment to understand what DOSBox is and how it works. DOSBox is an emulator that replicates the functionality of MS-DOS, the operating system widely used in personal computers during the 1980s and 1990s. It provides a virtual environment in which you can run MS-DOS games and software, creating a nostalgic experience for modern users.
Running Classic MS-DOS Games
To get started with DOSBox, you’ll first need to install the emulator on your computer. You can download DOSBox from the official website and follow the installation instructions for your operating system. Once installed, launch DOSBox to begin setting up your environment.
One important step in running MS-DOS games with DOSBox is creating a dedicated folder to store your games. This ensures that all the necessary files are organized in one place. You can create a folder called “DOS Games” or any other name you prefer. It’s important to note that DOSBox does not support long file names, so keep your folder and game names short and simple.
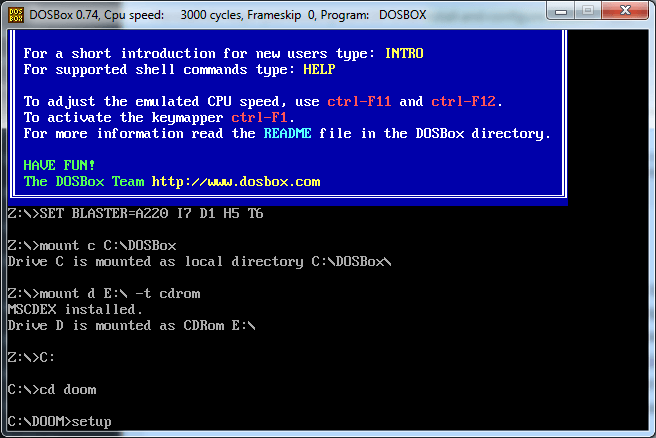
After creating the folder, you’ll need to use the MOUNT command to set the new drive for DOSBox. This command links a directory on your computer to a virtual drive within DOSBox, allowing you to access the games stored in that directory. To use the MOUNT command, open DOSBox and type the following:
MOUNT Replace
Once the drive is mounted, you can navigate to the newly mounted drive by typing the drive letter followed by a colon. For example, if you mounted your DOS Games folder on drive D, you would type D: to switch to that drive. From there, you can use the DIR command to list the contents of the drive and locate the game you want to play.
To run a game, simply type the name of the executable file (usually with a .exe extension) and press Enter. DOSBox will launch the game, allowing you to relive the nostalgia of classic MS-DOS gaming.
If using the MOUNT command sounds complicated, there are alternative methods for running a game with DOSBox. Many modern frontends, such as D-Fend Reloaded or LaunchBox, provide a more user-friendly interface for managing DOSBox and launching games. These frontends allow you to add your games to a library, making it easy to launch them with the click of a button. Additionally, you can create desktop shortcuts for your games, bypassing the need to navigate through DOSBox to access them.
Adjusting Performance Settings
DOSBox provides several options for adjusting performance settings to ensure the smooth running of your games. These options can be accessed through various key combinations, providing a quick and convenient way to fine-tune your experience.
To adjust the CPU cycles used by DOSBox, press CTRL+F7. This will decrease the number of CPU cycles, potentially slowing down the game, but also reducing the likelihood of performance issues. On the other hand, pressing CTRL+F8 will increase the CPU cycles, potentially making the game run faster. Use these key combinations to find the optimal balance between performance and gameplay.
If you need to decrease or increase the frameskip in a game, use the CTRL+F11 and CTRL+F12 key combinations, respectively. Frameskip determines how many frames are skipped in order to maintain a consistent frame rate. Decreasing the frameskip can result in smoother gameplay, but it may also impact performance. Increasing the frameskip can improve performance, but it may lead to choppier gameplay.
Additional Features for Windows Users
If you’re using DOSBox on a Windows computer, there are a couple of additional features that can enhance your experience. One of these features is the drag and drop method for starting games. Simply locate the executable file (usually with a .exe extension) of the game you want to play and drag it onto the DOSBox program window. DOSBox will automatically start the game, saving you the trouble of manually navigating through directories.
Another useful feature is the ability to automatically mount your DOS games folder by editing the dosbox.conf file. This file contains various configuration options for DOSBox, and by adding the necessary commands, you can ensure that your games folder is automatically mounted every time you start DOSBox. To do this, open the dosbox.conf file located in your DOSBox installation directory and add the following lines:
[autoexec] mount Replace
Toggle Fullscreen Mode
By default, DOSBox runs in a windowed mode. However, if you prefer to play your games in fullscreen mode, you can easily toggle between the two using the ALT+ENTER shortcut. Pressing ALT+ENTER will switch DOSBox to fullscreen mode, providing a more immersive gaming experience. To switch back to windowed mode, simply press ALT+ENTER again.
Conclusion
DOSBox is a versatile emulator that allows you to experience classic MS-DOS games on modern systems. Whether you’re a seasoned gamer looking to relive your favorite childhood memories or a curious newcomer interested in exploring gaming history, DOSBox provides the perfect platform for both. With this guide, you now have all the knowledge you need to configure DOSBox and start playing your favorite MS-DOS games. So go ahead, dive into the world of nostalgia and let the games begin!
